Table of Contents
- Dashly for Android
- Installation
- Upgrade to Version 2.0.0
- Initialization
- User Authentication
- User Properties and Events
- Chat with Operator
- Floating Button
- Opening Chat from Any Location
- Notifications
- Firebase Cloud Messaging Setup
- Huawei Push Kit Setup
- General Notification Settings
Dashly for Android
Dashly for Android supports API 19 and above.
Installation
Currently, Dashly for Android can be installed using gradle.
To do this, add the repository to the project build.gradle file:
allprojects {
    ...
    repositories {
        ...
        maven { url "https://raw.github.com/carrotquest/android-sdk/dashly" }
        maven { url "https://jitpack.io" }
    }
}
Specify the dependencies in your application's build.gradle file:
android {
    ...
    defaultConfig {
        ...
        multiDexEnabled true
    }
    packagingOptions {
        exclude 'META-INF/*.kotlin_module'
    }
}

dependencies {
    ...
    implementation 'com.android.support:multidex:1.0.3'
    implementation 'io.carrotquest:android-sdk:2.0.1-usRelease'
}
The library uses Java 17. If your project uses a Java version below 17, add the following settings:
android {
    ...
    compileOptions {
        sourceCompatibility '17'
        targetCompatibility '17'
    }
}
Upgrade
Note that when transitioning to version 2.0.0, some important changes were made to the way you interact with the library.
To unify the code with the iOS SDK, one parameter - appId - was removed from the library's initialization method. Now, the best way to initialize the library looks like this:
Dashly.setup(this, yourApiKey, object : Dashly.Callback<Boolean> {
    override fun onResponse(result: Boolean) {

    }

    override fun onFailure(t: Throwable) {

    }
})
If you have user authentication, make sure to call it at the start of the application. The best place for this is in the onResponse callback of the setup method:
Dashly.setup(this, yourApiKey, object : Dashly.Callback<Boolean> {
    override fun onResponse(result: Boolean) {
        if(result) {
            Dashly.auth(userId, userAuthKey, object : Dashly.Callback<String> {
                override fun onResponse(result: String?) {

                }

                override fun onFailure(t: Throwable) {

                }
            })
        }
    }

    override fun onFailure(t: Throwable) {

    }
})
This will prevent unnecessary anonymous user occurrences.
Initialization
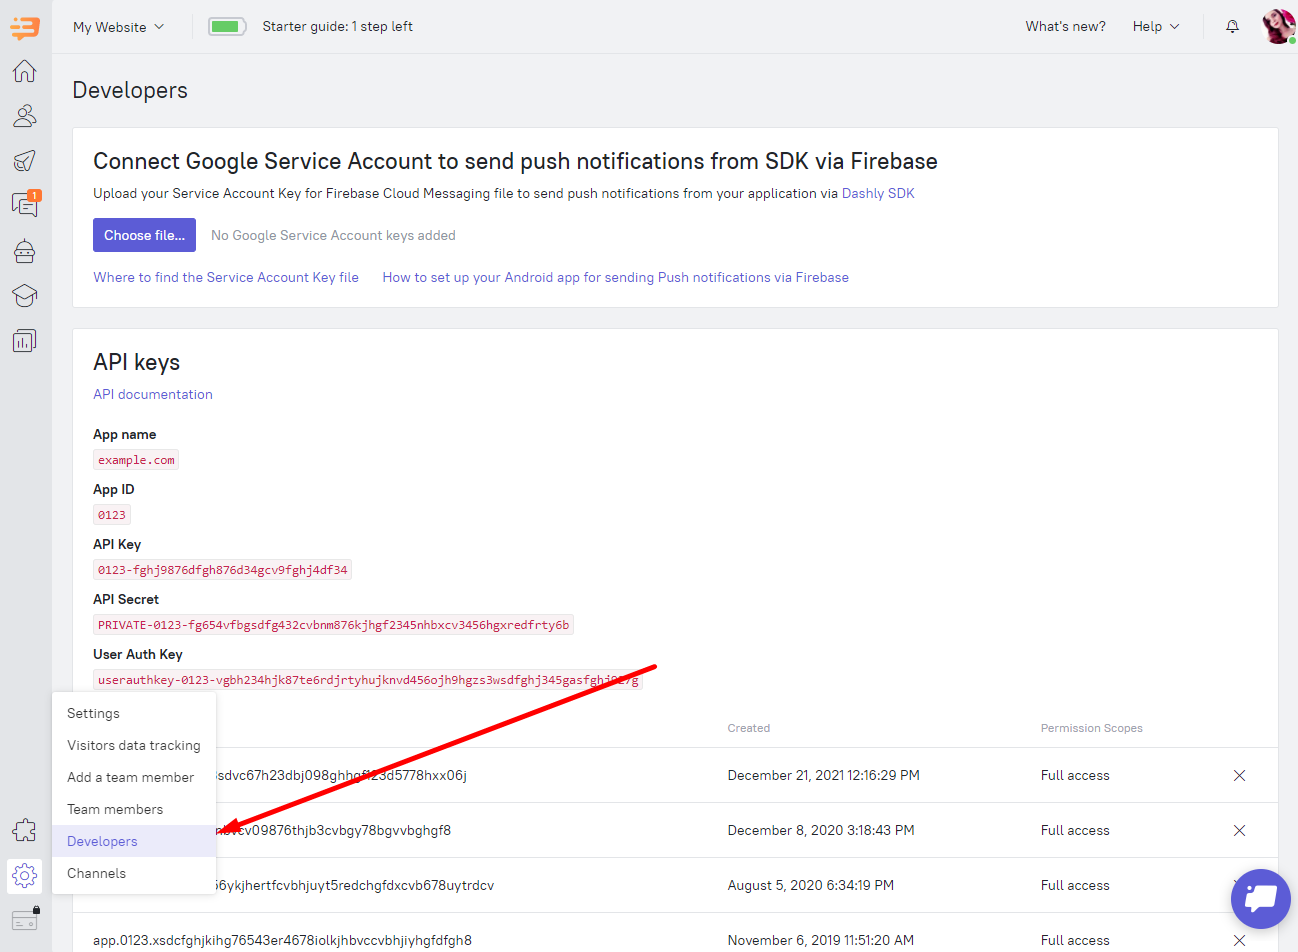
To use Dashly for Android, you need the API Key and User Auth Key. You can find these keys in the Settings > Developers tab:
To initialize Dashly, you need to execute the following code in your application's onCreate() method:
Dashly.setup(this, apiKey, callback)
To display additional information during debugging, use the method:
Dashly.setDebug(true)
User Authentication
If your application includes user authentication, you can pass the user id to Dashly. There are two ways to authenticate: directly pass the userAuthKey, or send a hash generated on your backend. Upon successful login, the dashly_id property value is returned in the callback.
- Login via user auth key:
Dashly.auth(userId, userAuthKey, callback)
- Login via hash:
Dashly.hashedAuth(userId, hash, callback)
To change the user, you need to first call the deinitialization method, and then re-call the initialization and (optionally) authentication methods:
Dashly.deInit(object : Dashly.Callback<Boolean> {
    override fun onResponse(result: Boolean) {
        Dashly.setup(this, yourApiKey, callbackSetup)
    }

    override fun onFailure(t: Throwable) {

    }
})
User Properties and Events
You can set user properties using:
Dashly.setUserProperty(userProperty)
Dashly.setUserProperty(userPropertyList)
To describe user properties, use the UserProperty class:
public UserProperty(String key, String value)
public UserProperty(Operation operation, String key, String value)
For more details on Operations, please refer to the «User Properties» section.
Attention!
The key field cannot start with the $ symbol.
For setting system properties, two classes CarrotUserProperty and EcommerceUserProperty are implemented.
To track events, use:
Dashly.trackEvent(eventName)
You can specify additional parameters for an event in JSON format and pass them to the method:
Dashly.trackEvent(eventName, eventParams)
The SDK offers the ability to track navigation within the application to launch various trigger messages on specific screens if needed. Use the following method for this:
Dashly.trackScreen(screenName)
You can retrieve a list of identifiers for unread conversations at the moment:
Dashly.getUnreadConversations()
You can also subscribe to changes in the list of unread conversation identifiers:
Dashly.setUnreadConversationsCallback(callback)
Chat with Operator
You can give the mobile app user the ability to access the chat with an operator from anywhere. This can be accomplished in two ways—using a floating button or directly calling the chat opening method at any desired time.
Floating Button
Essentially, this is a user interface element inheriting from ConstraintLayout. You can embed it into your layout:
<io.carrotquest_sdk.android.ui.fab.FloatingButton
    android:id="@+id/cq_sdk_float_button"
    android:layout_width="match_parent"
    android:layout_height="match_parent"
    app:cq_location_fab="BOTTOM_RIGHT"
    app:cq_visibility_background="false"
    app:cq_icon_fab="@drawable/ic_send"
    app:cq_margin_fab="8dp"
    app:cq_show_social_labels="false"
    app:cq_auto_hide_fab="true"
/>
This element has its own attributes:
- app:cq_location_fab dictates the placement of the floating button relative to its parent container. There are 4 possible positions: TOP_LEFT, TOP_RIGHT, BOTTOM_LEFT, BOTTOM_RIGHT; default is BOTTOM_RIGHT.
- app:cq_visibility_background controls the visibility of the dimming effect when the floating button is pressed. Default is true.
- app:cq_icon_fab sets the icon for the floating button. Default is @id/ic_cq_message.
- app:cq_margin_fab specifies the margins of the floating button relative to its parent container. Default is 16dp.
- app:cq_show_social_labels manages the visibility of labels next to social media icons. Default is true.
- app:cq_auto_hide_fab determines automatic hiding of the chat button when the internet is unavailable. Default is false.
Floating Button Interface
Available methods for configuring and managing the floating button's behavior:
/**
 * Show the floating button
 */
public void showFab()
/**
 * Hide the floating button
 */
public void hideFab()
/**
 * Show integration buttons
 */
public void expandMenu()
/**
 * Hide integration buttons
 */
public void collapseMenu()
/**
 * Set chat icon
 * @param iconFAB Icon
 */
public void setIconFAB(Drawable iconFAB)
/**
 * Set button margins from screen edges
 * @param margin Margin value
 */
public void setMarginFAB(int margin)
/**
 * Set button location
 * @param location Button location
 */
public void setLocationFAB(LocationFAB location)
Opening Chat from Any Location
You can also open the chat by executing the following code from any location (post initialization):
Dashly.openChat(context)
Notifications
The SDK supports two push notification providers - Firebase Cloud Messaging and Huawei Push Kit.
Firebase Cloud Messaging Setup
First, you need to obtain a key and send it to Dashly. You can find the field for entering the key in Settings > Developers > Push notifications for SDK. The setup process for Firebase Cloud Messaging is described here.
If you are already using Firebase Cloud Messaging for your push notifications, to ensure that push notifications work correctly in the SDK, you need to edit your FirebaseMessagingService. This is necessary to pass the token and our messages into the SDK. Example:
class MyFirebaseMessagingService : FirebaseMessagingService() {
    override fun onMessageReceived(message: RemoteMessage) {
        val pushData: Map<String, String> = message.data

        if (Dashly.isDashlyPush(pushData)) {
            Dashly.sendPushNotification(pushData, this)
        } else {
            // Your code
        }
    }

    override fun onNewToken(token: String) {
        Dashly.sendToken(token)
        super.onNewToken(token)
    }
}
Huawei Push Kit Setup
To deliver notifications to users with devices without Google services, you can use Huawei's push notification delivery service. First, you need to integrate HPK into your application. Instructions can be found here. Then, in Settings > Developers > Push notifications for SDK, you need to provide the Client ID, Client Secret, and Webhook Secret. Next, modify the service inherited from HmsMessageService. Example:
class MyHuaweiPushKitService : HmsMessageService() {
    override fun onMessageReceived(remoteMessage: RemoteMessage?) {
        val pushData: Map<String, String> = remoteMessage?.dataOfMap ?: HashMap()
        if (Dashly.isDashlyPush(pushData)) {
            Dashly.sendPushNotification(pushData, this)
        } else {
            // Your code
        }
    }

    override fun onNewToken(token: String?) {
        Dashly.sendToken(token)
        super.onNewToken(token)
    }

    override fun onNewToken(token: String?, p1: Bundle?) {
        Dashly.sendToken(token)
        super.onNewToken(token, p1)
    }
}
General Notification Settings
You can change the icon and color of notifications for new messages. To set the icon for notifications, call the following method after initializing the SDK:
Dashly.setNotificationIcon(R.drawable.ic_notification_icon)
Alternatively, add an icon named ic_cq_notification.xml in the res/drawable directory. To set the notification color, specify a color named colorCqNotify with your desired value in the resource file:
<color name="colorCqNotify">#EF7F28</color>
If you want to receive information about new messages in the SDK from anywhere in your application, you can implement a BroadcastReceiver. Example implementation:
public class MyNewMessageBroadcastReceiver extends BroadcastReceiver {
    @Override
    public void onReceive(Context context, Intent intent) {
        if(intent.hasExtra(NotificationsConstants.CQ_SDK_NEW_MESSAGE_ARG)) {
            IncomingMessage incomingMessage = (IncomingMessage) intent.getSerializableExtra(NotificationsConstants.CQ_SDK_NEW_MESSAGE_ARG);
            if (incomingMessage != null) {
                Toast.makeText(context, incomingMessage.getText(), Toast.LENGTH_SHORT).show();
            }
        }
    }
}
IncomingMessage is a class that describes the incoming message.
Next, you need to register it:
MyNewMessageBroadcastReceiver messageReceiver = new MyNewMessageBroadcastReceiver();
IntentFilter filter = new IntentFilter();
filter.addAction(NotificationsConstants.CQ_SDK_NEW_MESSAGE_ACTION);
registerReceiver(messageReceiver, filter);
Important! If the application is closed and the user opens the chat by clicking a push, your start activity will not launch. The application will close along with the closure of the chat. To fix this, you can pass the full name of the activity that should launch when the chat is closed:
Dashly.setParentActivityClassName("io.test.MainActivity");