Dashly for iOS
![]()

Table of Contents
- Installation
- Update 3.0.0
- Swift
- Initialization
- User authorization
- User properties and events
- Navigation tracking
- Live chat
- Opening links manually
- Notifications
- Objective-C
- Initialization
- User authorization
- User properties and events
- Navigation tracking
- Live chat
- Opening links manually
- Notifications
- Important information about Push notifications
- Double notifications
- Notifications unsubscribe method
- Xcode 15
- Turn off logs
Installation
You can install Dashly for iOS via CocoaPods or Swift Package Manager.
CocoaPods
Add the following line to your Podfile:
pod 'DashlySDK'
Swift Package Manager
In Xcode, click “File → Add Package Dependency…”
Then in the window that appears, in the “Search or Enter Package URL” field, paste the Swift Package Manager repository URL:
https://github.com/carrotquest/dashly-ios-spm.git
Initialization
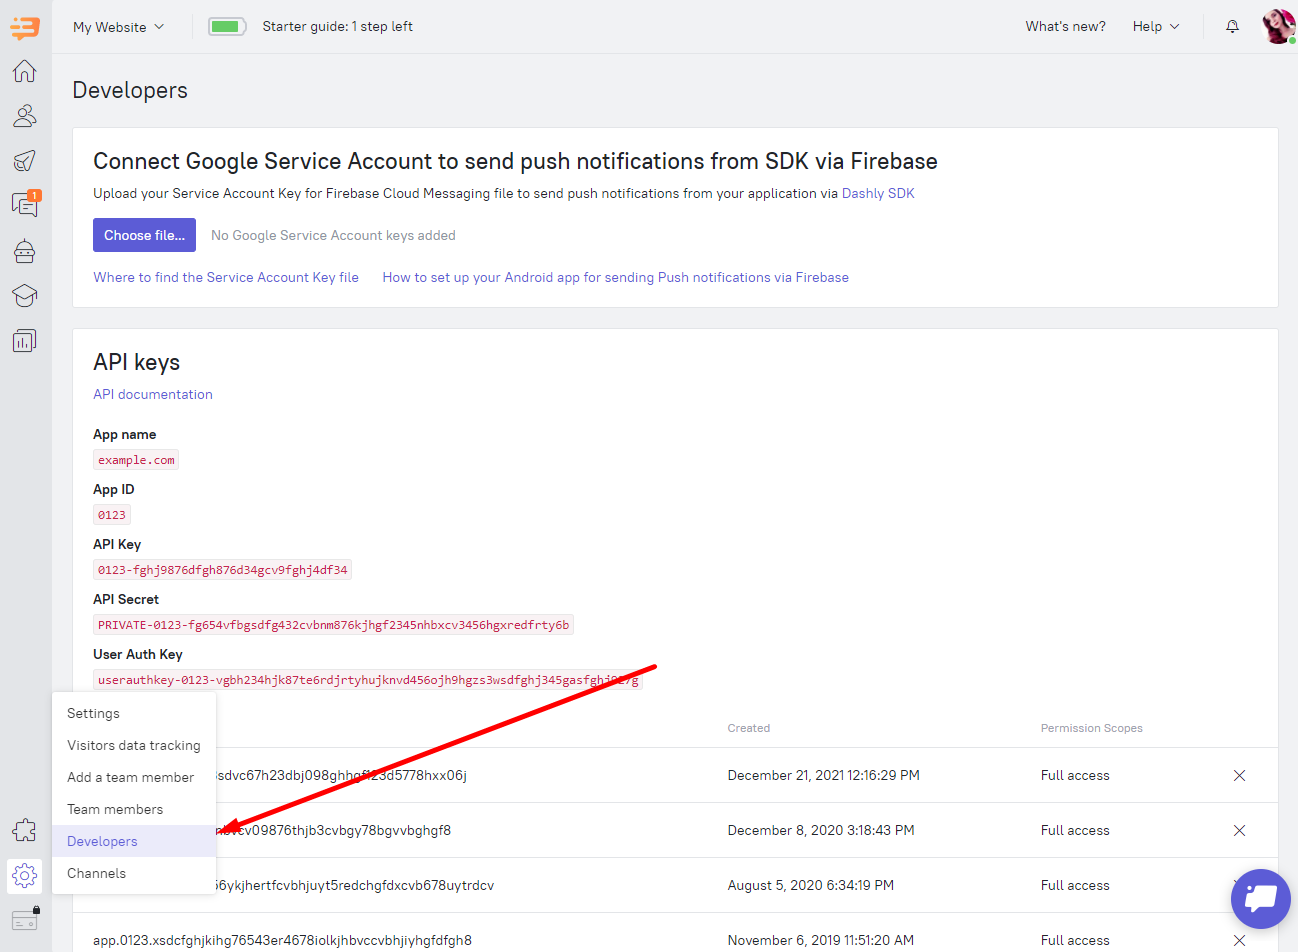
You’ll need an API key and a User Auth key to work with Dashly for iOS. Those can be found on Settings - Developers tab:
Update 3.0.0
With version 3.0.0, we changed how the library integrates with your app.
If you have user authorization, you need to call it when the application starts. The best place to do this is in the successHandler of the setup method:
Dashly.shared.setup(
    withApiKey: apiKey,
    successHandler: {
        if let userId = userId {
            Dashly.shared.auth(
                withUserId: userId,
                withUserAuthKey: userAuthKey, // or withHash: hash,
                    successHandler: { dashlyId in
                        print("Dashly SDK user auth succeeded, DashlyId = \(dashlyId)")
                    },
                    errorHandler: { error in
                        print("Dashly SDK user auth error: " + error)
                    })
        }
    },
    errorHandler: { error in
        print("Failed to connect Dashly SDK, reason: \(error)")
    }
)
This prevents the unnecessary creation of anonymous users.
Similarly, to unify the code with Android SDK, the withTheme argument was moved from the setup method to a separate method:
Dashly.shared.setTheme(.fromMobile)
As before, there are four possible values:
enum Theme {
    case light // Light theme
    case dark // Dark theme
    case fromMobile // Match device theme
    case fromWeb // Match admin panel settings
}
Swift
Initialization
You should add this code into your app's AppDelegate file in order to initialize Dashly:
func application(_ application: UIApplication, didFinishLaunchingWithOptions launchOptions: [UIApplication.LaunchOptionsKey:Any]?) -> Bool {
    ....
    Dashly.shared.setup(
        withApiKey: key,
        successHandler: {
                print("Dashly SDK connected")
        },
        errorHandler: { error in
            print("Dashly SDK error: " + error)
        })
    ....
}
User authorization
If your app has user authentication, you should pass the user ID to Dashly. There are two ways of authorization: send userAuthKey directly, send hash generated at your backend.
- Send userAuthKey directly
Dashly.shared.auth(
    withUserId: userId,
    withUserAuthKey: userAuthKey,
        successHandler: { dashlyId in
            print("Dashly SDK user auth succeeded, DashlyID = \(dashlyId)")
        },
        errorHandler: { error in
            print("Dashly SDK user auth error: " + error)
        })
- Send hash generated at your backend
Dashly.shared.hashedAuth(
    withUserId: userId,
    withHash: hash,
        successHandler: { dashlyId in
            print("Dashly SDK user auth succeeded, DashlyID = \(dashlyId)")
        },
        errorHandler: { error in
            print("Dashly SDK user auth error: " + error)
        })
To realize the logout function:
Dashly.shared.logout(
    successHandler: {
        print("Dashly SDK user logout succeeded")
    },
    errorHandler: { error in
        print("Dashly SDK user logout error: " + error)
    })
User properties and events
You can set user properties using this method:
Dashly.shared.setUserProperty(userProperties)
Where userProperties is an object of [UserProperty] type.
UserProperty class should be used for user properties description:
UserProperty(key: key, value: value)
UserProperty(key: key, value: value, operation: .updateOrCreate)
More info on Operations can be found in «User properties» section.
Important!
key field value should not start with $.
DashlyUserProperty and EcommerceUProperty classes should be used to set system properties.
Use the following method for event tracking:
Dashly.shared.trackEvent(withName: name, withParams: params)
where params is a JSON string with additional event parameters
Navigation tracking
The SDK can track navigation in order to trigger messages on specific screens when needed. To do this, use the method:
let name: String = "screenName"
Dashly.shared.trackScreen(name)
Live chat
You can give your users an opportunity to start a live chat (with your operator) from anywhere. You can either add a floating button or open the chat programmatically at any time.
Floating Button
You can use the following method to add chat button:
Dashly.shared.showButton(in: view)
Use this method to hide chat button:
Dashly.shared.hideButton()
Open chat from anywhere
After initialization you can open chat from any place using this method:
Dashly.shared.openChat()
Getting the number of unread dialogs and messages
To keep track of the number of unread dialogs:
Dashly.shared.getUnreadConversationsCount { count in
    print("Dashly SDK dialogs count: \(count)")
}
and for the number of unread messages:
Dashly.shared.getUnreadMessagesCount { count in
    print("Dashly SDK messages count: \(count)")
}
Tracking SDK UI Visibility
You can track whether any SDK UI element (chat, dialog list, popup, etc.) is currently visible on the screen. The callback is triggered every time the UI appears or disappears:
Dashly.shared.onVisibilityUIChanged { isVisible in
    print("Dashly SDK — isVisible: \(isVisible)")
}
If isVisible == true, it means that some part of the SDK UI is currently being shown. If false, no SDK UI is visible on the screen.
Opening links manually
To handle universal links from inside the SDK, use the custom URL opener to control how links are opened. It can be called anywhere, but preferably somewhere in your AppDelegate/SceneDelegate near the SDK initialization:
import DashlySDK

CustomUrlOpener.shared.set(for: .chat, customLogic: { url in
      // Any custom logic for opening links
})
The first argument (labeled for) accepts one of four options:
- push - changes the logic when clicking on a link in push
- chat - changes the logic when clicking on a link in chat
- popup - changes logic when clicking on a link in popup
- all - changes the logic when clicking on a link in all 3 places
So if you want to handle deeplink (universal link) clicks in all places in the SDK, you can write some code like this:
import DashlySDK

CustomUrlOpener.shared.set(for: .all) { url in
    if url.host?.contains("YOUR DOMAIN") ?? false {
        CustomUrlOpener.shared.openUniversalLink(url)
    } else {
        CustomUrlOpener.shared.openBrowserLink(url)
    }
}
If anything, there is no error here. Current versions of Swift do not allow you to specify the label of the last closure in a function call.
Notifications
SDK uses Firebase Cloud Messaging for sending notifications. You need to obtain a key and send it to our support team. You can find an input for this key at "Settings" - "Developers" tab of Dashly admin panel. Cloud Messaging setup is described here
Set the FCM token for Dashly SDK in your MessagingDelegate like this:
import FirebaseMessaging
import DashlySDK
extension AppDelegate: MessagingDelegate {
    func messaging(_ messaging: Messaging, didReceiveRegistrationToken fcmToken: String?) {
        if let fcmToken = fcmToken {
            DashlyNotificationService.shared.setToken(fcmToken)
        } else {
            print("Dashly SDK error: fcmToken not found")
        }
        ...
    }
}
Add this code into UNUserNotificationCenterDelegate to display notifications:
import DashlySDK
extension AppDelegate: UNUserNotificationCenterDelegate {
    func userNotificationCenter(
        _ center: UNUserNotificationCenter,
        willPresent notification: UNNotification,
        withCompletionHandler completionHandler: @escaping (UNNotificationPresentationOptions) -> Void) {
        let notificationService = DashlyNotificationService.shared
        if notificationService.canHandle(notification) {
            notificationService.show(notification, completionHandler: completionHandler)
        } else {
            // user notifications logic
        }
    }
}
Use this for handling clicks on notifications:
import DashlySDK
extension AppDelegate: UNUserNotificationCenterDelegate {
    func userNotificationCenter(
        _ center: UNUserNotificationCenter,
        didReceive response: UNNotificationResponse,
        withCompletionHandler completionHandler: @escaping () -> Void) {
        let notificationService = DashlyNotificationService.shared
        if notificationService.canHandle(response) {
            notificationService.clickNotification(notificationResponse: response)
        } else {
            // user notifications logic
        }
        completionHandler()
    }
}
Objective-C
Initialization
You should add this code into your app's AppDelegate file in order to initialize Dashly:
#import "DashlySDK/DashlySDK.h"

- (BOOL)application:(UIApplication *)application didFinishLaunchingWithOptions:(NSDictionary *)launchOptions {
    ....
    Dashly *dashly = [Dashly shared];
    [
        dashly
        setupWithApiKey: API-KEY
        successHandler: ^(){
            NSLog(@"Dashly SDK connected");
        }
        errorHandler: ^(NSString *error){
            NSLog(@"Dashly SDK error: %@", error);
    }];
    ....
    return YES;
}
User authorization
In case your application has user authorization, you might want to send user id to Dashly. There are two ways of authorization: send userAuthKey directly, send hash generated at your backend.
- Send userAuthKey directly
Dashly *dashly = [Dashly shared];
[
  dashly
  authWithUserId: userId
  withUserAuthKey: userAuthKey
  successHandler: ^(NSString *dashlyId){
      NSLog(@"Dashly SDK user auth succeeded, DashlyId: %@", dashlyId);
  }
  errorHandler: ^(NSString *error){
      NSLog(@"Dashly SDK user auth error: %@", error);
}];
- Send hash generated at your backend
Dashly *dashly = [Dashly shared];
[
  dashly
  authWithUserId: userId
  withHash: hash
  successHandler: ^(NSString *dashlyId){
      NSLog(@"Dashly SDK user auth succeeded, DashlyId: %@", dashlyId);
  }
  errorHandler: ^(NSString *error){
      NSLog(@"Dashly SDK user auth error: %@", error);
}];
To realize the logout function:
Dashly *dashly = [Dashly shared];
[
  dashly
  logoutWithSuccessHandler: ^(){
     NSLog(@"Dashly SDK user logout successed");
  } errorHandler: ^(NSString *error){
     NSLog(@"Dashly SDK user logout error: %@", error);
}];
User properties and events
You can set user properties, using this method:
Dashly *dashly = [Dashly shared];
[
  dashly
  setUserProperty:userProperties
];
Where userProperties is an object of [UserProperty] type.
UserProperty class should be used for user properties description:
Dashly *dashly = [Dashly shared];
UserProperty *userProp = [[UserProperty alloc] initWithKey: key value: value];
UserProperty *userProp = [[UserProperty alloc] initWithKey: key value: value operation: @"updateOrCreate"];
More info on Operations can be found in «User properties» section.
Important!
key field value should not start with $.
DashlyUserProperty and EcommerceUProperty classes should be used to set system properties.
Use the following method for events tracking:
Dashly *dashly = [Dashly shared];
[
  dashly
  trackEventWithName: name
  withParams: params
];
where params is a JSON string with additional event parameters
Navigation tracking
The SDK can track navigation in order to trigger messages on specific screens when needed. To do this, use the method:
Dashly *dashly = [Dashly shared];
[dashly trackScreen:@"screenName"];
Live chat
You can give your users an opportunity to start a live chat (with your operator) from anywhere. This can be done two ways - either by adding a floating button or by directly calling a chat opening method at desired moment.
Floating Button
You can use the following method to add chat button:
Dashly *dashly = [Dashly shared];
[dashly showButtonIn: self.view];
Use this method to hide chat button:
Dashly *dashly = [Dashly shared];
[dashly hideButton];
Open chat from anywhere
After initialization you can open chat from any place using this method:
Dashly *dashly = [Dashly shared];
[dashly openChat];
Getting the number of unread dialogs and messages
To keep track of the number of unread dialogs:
Dashly *dashly = [Dashly shared];
[
  dashly
  getUnreadConversationsCount:^(NSInteger count){
        NSLog(@"Dashly SDK dialogs count: %ld", (long)count);
}];
and for the number of unread messages:
Dashly *dashly = [Dashly shared];
[
  dashly
  getUnreadMessagesCount:^(NSInteger count){
        NSLog(@"Dashly SDK dialogs count: %ld", (long)count);
}];
Tracking SDK UI Visibility
You can track whether any SDK UI element (chat, dialog list, popup, etc.) is currently visible on the screen. The callback is triggered every time the UI appears or disappears:
Dashly *dashly = [Dashly shared];
[
  dashly
  onVisibilityUIChanged:^(BOOL isVisible){
        NSLog(@"Dashly SDK — isVisible: %@", isVisible ? @"YES" : @"NO");
}];
If isVisible == true, it means that some part of the SDK UI is currently being shown. If false, no SDK UI is visible on the screen.
Opening links manually
In order for universal links to work correctly when clicking on a link inside the SDK, there is a special method for manually controlling the method of opening links. It can be called anywhere, but preferably somewhere in your AppDelegate/SceneDelegate near the SDK initialization:
CustomUrlOpener *opener = [CustomUrlOpener shared];

[
  opener
  for: 1
  customLogic: ^(NSURL *url){
       // Any custom logic for opening links
   }
];
As you can see, the first argument that has label for the 4 available options:
- push - changes the logic when clicking on a link in push
- chat - changes the logic when clicking on a link in chat
- popup - changes logic when clicking on a link in popup
- all - changes the logic when clicking on a link in all 3 places
Note: the numeric values (e.g., 1 or 3) represent specific scopes; if an enum is available in your SDK, prefer using the enum instead of magic numbers.
So if you want to handle deeplink (universal link) clicks in all places in the SDK, you can write some code like this:
CustomUrlOpener *opener = [CustomUrlOpener shared];

[
  opener
  for: 3
  customLogic: ^(NSURL *url){
       if ([[url host] containsString:@"YOUR DOMAIN"]) {
            [[CustomUrlOpener shared] openUniversalLink:url];
        } else {
            [[CustomUrlOpener shared] openBrowserLink:url];
        }
   }
];
Notifications
SDK uses Firebase Cloud Messaging for sending notifications. At the moment you are required to get a key and send it to our support. You can find an input for this key at "Settings" - "Developers" tab of Dashly admin panel. Cloud Messaging setup is described here. fcmToken for Dashly SDK should be set in MessagingDelegate next:
#import "DashlySDK/DashlySDK.h"
#import <Firebase.h>

- (void)messaging:(FIRMessaging *)messaging didReceiveRegistrationToken:(NSString *)fcmToken {
    DashlyNotificationService *service = [DashlyNotificationService shared];
    [service setToken: fcmToken];
}
Add this code into UNUserNotificationCenterDelegate to display notifications:
#import <UserNotifications/UserNotifications.h>

- (void)userNotificationCenter:(UNUserNotificationCenter *)center
       willPresentNotification:(UNNotification *)notification
         withCompletionHandler:(void (^)(UNNotificationPresentationOptions options))completionHandler {
    DashlyNotificationService *service = [DashlyNotificationService shared];
    if ([service canHandle:notification]) {
        [service show:notification appGroudDomain:nil completionHandler:completionHandler];
    } else {
        // user notifications logic
    }
}
Use this for handling clicks on notifications:
#import <UserNotifications/UserNotifications.h>

- (void)userNotificationCenter:(UNUserNotificationCenter *)center
didReceiveNotificationResponse:(UNNotificationResponse *)response
         withCompletionHandler:(void(^)(void))completionHandler {
    DashlyNotificationService *service = [DashlyNotificationService shared];
    if ([service canHandleWithResponse:response]) {
        [service clickNotificationWithNotificationResponse:response appGroudDomain:nil openLink:YES];
    } else {
        // user notifications logic
    }
}
Important information about Push notifications
You need to add a parameter to info.plist of your project:
<key>FirebaseAppDelegateProxyEnabled</key>
<string>0</string>
And make sure that the field has a string value. Briefly, this switches the notification management to manual mode and allows the SDK to function properly. You can read more here.
You can read more about why you need the appGroudDomain clause here.
You can read more about why you need the openLink clause here.
Double notifications
Because messages can arrive through two channels, the same notification may be delivered twice. Examples: when logging out or quickly deleting a notification there is a possibility of getting the same notification. Notification Service Extension should be created to prevent such behavior. Choose your project in files list of Xcode, then File/New/Target/Notification Service Extension.
After that register in AppGroup Apple Developer Portal. Identifier App Group should be unique and start with "group.", otherwise it would not be accepted by Xcode.
Add Identifier into Xcode:
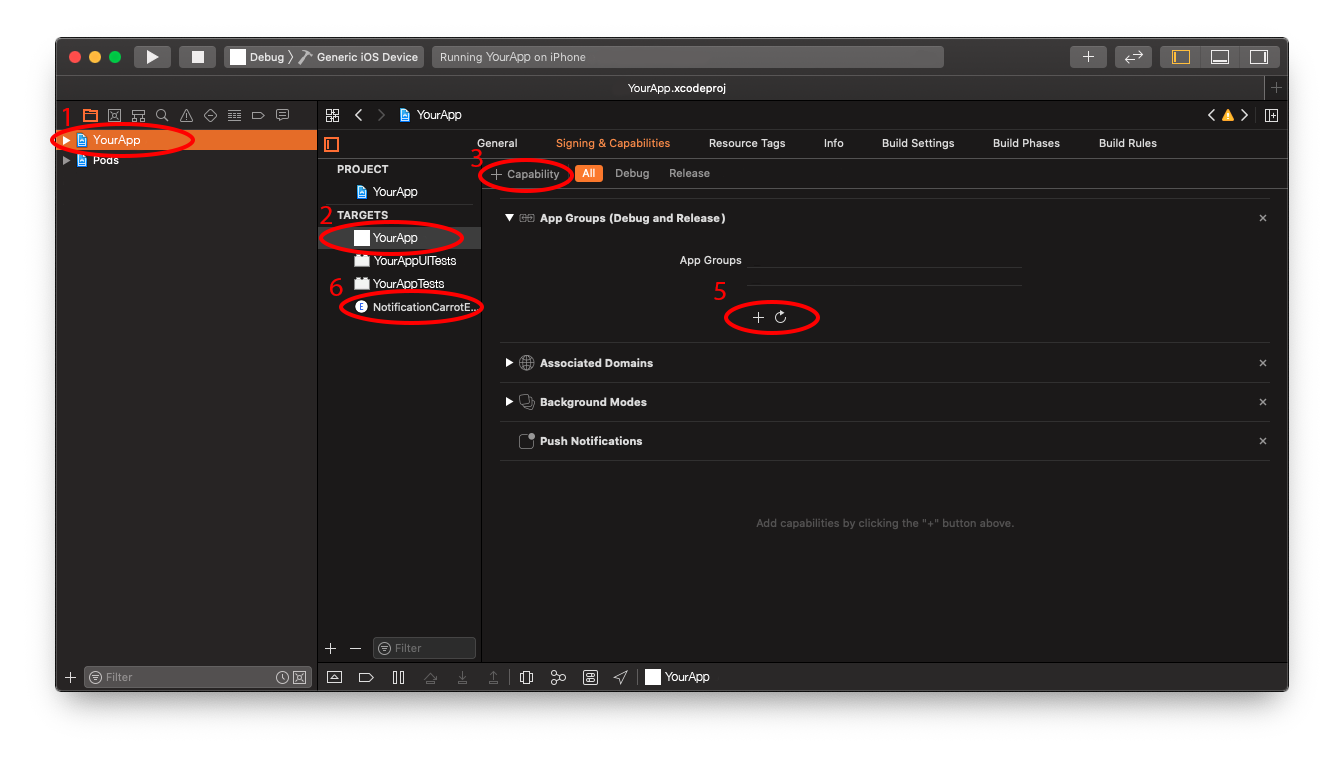
1) Choose your project in the files list. 2) Choose your project's name in targets list. 3) Click "+ Capability" in "Signing & Capabilities" tab.
4) Find and choose App Group in droplist. 5) An empty App Group identifiers list will be shown in the tab. Add Identifier previously registered on Apple Developer Portal here. 6) Go back to Targets list. Add App Group into your Notification Service Extension. Add next string to SDK init:
   Dashly.shared.setup(
   ...
       withAppGroup: <group_id>,
   ...
   )
You should now add logic into your Notification Service Extension. A new folder with your Notification Service Extension name should have appeared in the files list. Add code into NotificationService.swift:
import UserNotifications
import DashlySDK

class NotificationService: UNNotificationServiceExtension {
    var contentHandler: ((UNNotificationContent) -> Void)?
    var bestAttemptContent: UNMutableNotificationContent?
    override func didReceive(_ request: UNNotificationRequest, withContentHandler contentHandler: @escaping (UNNotificationContent) -> Void) {
        self.contentHandler = contentHandler
        guard let bestAttemptContent = (request.content.mutableCopy() as? UNMutableNotificationContent) else {
            return
        }
        self.bestAttemptContent = bestAttemptContent
        let domain = "Identifier previously registered on the Apple Developer Portal"
        DashlyNotificationService.shared.deleteDuplicateNotification(withContent: bestAttemptContent, appGroudDomain: domain)
        contentHandler(bestAttemptContent)
    }

    override func serviceExtensionTimeWillExpire() {
        if let contentHandler = contentHandler, let bestAttemptContent =  bestAttemptContent {
            contentHandler(bestAttemptContent)
        }
    }
}
Refresh your pod file and add this:
   target 'NotificationService' do
     inherit! :search_paths
     pod 'DashlySDK'
   end
Lastly, send Identifier previously registered on Apple Developer Portal into show method in UNUserNotificationCenterDelegate:
let domain = "Identifier previously registered on Apple Developer Portal"
notificationService.show(notification, appGroudDomain: domain, completionHandler: completionHandler)
Notifications unsubscribe method
There are methods to unsubscribe a particular user from fluff and from all mailings in principle.
A method for unsubscribing from push:
import DashlySDK

DashlyNotificationService.shared.pushNotificationsUnsubscribe()
A method for unsubscribing from all push campaigns:
import DashlySDK

DashlyNotificationService.shared.pushCampaignsUnsubscribe()
Xcode 15
If you are using Xcode 15 and above, and CocoaPods 1.12.1 and below, you will get a directory error like this:

To fix this, add the following code to the end of your podfile:
post_install do |installer|
  installer.pods_project.targets.each do |target|
    target.build_configurations.each do |config|
      if config.base_configuration_reference.is_a? Xcodeproj::Project::Object::PBXFileReference
        xcconfig_path = config.base_configuration_reference.real_path
        IO.write(xcconfig_path, IO.read(xcconfig_path).gsub("DT_TOOLCHAIN_DIR", "TOOLCHAIN_DIR"))
      end
    end
  end
end
Perhaps in the future, CocoaPods will be updated and this code will have to be removed, but for now, it is necessary.
Turn off logs
To turn off the debug logs from the SDK's built-in Moya and from the SDK itself, you need to add a special key to your project's info.plist.
XML (Plist)
<key>moyaLog</key>
<string>0</string>
0 - logs off
1 - logs on